Working with SLA Rules
Note: This topic refers mainly to "Jobs," but what it describes also applies to Workflows.
To take advantage of the SLA capabilities, you must create SLA Rules. Each SLA Rule monitors a single Job Definition or Workflow Definition. When you create an SLA Rule, you specify when you expect the Job or Workflow to start or end, and what should happen if the run starts or ends late. RunMyJobs can notify operators of problems via email, Alert Alerts, and Custom Alerts.
Choosing Jobs to Monitor
First, you must decide which Jobs to monitor. Note that each SLA Rule is can monitor a single Job run per day. You can use SLA with Job or Workflow Definitions that run continuously with restart behaviors, or that run multiple times per day, but be aware of the following limitations:
-
Each SLA Rule tracks a single Job Definition or Workflow Definition.
-
If you want to monitor a Job that runs multiple times a day, you must create a separate SLA Rule for each run. So, for example, if a Job runs at midnight and at noon, you need two SLA Rules to monitor both runs.
-
If you want to monitor both the start time and end time of a Job, you must use two separate rules.
Note: You can use SLA with a Job Definition that is used within a Workflow Definition.
Edit Rule Definition Window
To create an SLA Rule, click  at the top.
The Edit Rule Definition window provides the following controls for configuring SLA Rules.
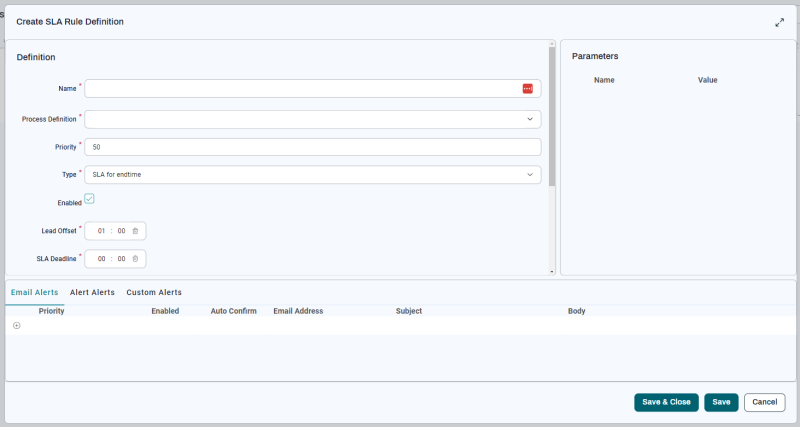
Definition Area
| Field | Description | Default Value | Valid Values |
|---|---|---|---|
| Name |
The name of the rule. Redwood recommends naming a rule so that it includes the name of the Job it monitors, because the SLA Dashboard does not include a column for Job Definition names. Also, if multiple rules exist for the same Job Definition (for example, if the Job is scheduled to run multiple times per day), the rule name should have a suffix indicating the run count or expected run time. Sample naming convention: Examples that use this naming convention:
|
|
|
| Job Definition | The Job Definition or Workflow Definition the rule should monitor. |
|
|
| Priority | The relative priority of this SLA Rule. If two SLA Rules are applied to the same Job, the SLA Rule with the highest Priority value is used. | 50
|
1-100 |
| Type |
Type of SLA Rule definition. The options are:
|
SLA for endtime | |
| Enabled | Lets you enable or disable the rule. |
|
|
| Lead Offset |
The amount of time BEFORE the SLA Deadline that the SLA Extension should monitor. For example, if you have a SLA Deadline of 11:00 and a Lead Offset of Tip: For more information, see Understanding Lead Offset and Late Offset. |
1:00
|
[0-23]:[00-59]
|
| SLA Deadline | The SLA Deadline for start or end time, depending on the Type field. For more information, see Understanding Lead Offset and Late Offset. | 00:00
|
[0-23]:[00-59]
|
| Time Zone |
The time zone to use for the rule. Note: If this time zone uses Daylight Savings Time, make sure a time zone is set on all Job and Workflow Definitions. |
Time zone specified in User Settings. | |
| Late Offset |
The duration ( Tip: For more information, see Understanding Lead Offset and Late Offset. |
01:00
|
[0-23]:[00-59]
|
| Time Window | If you specify a Time Window here, the rule only runs during that Time Window. |
|
|
| Rule tags | Rule tags let you filter the Jobs displayed in the SLA Dashboard. When you are creating SLA Rules, you can enter a comma-separated list of arbitrary strings in the Rule Tags field. In the SLA Dashboard, those rule tags display in the Rule Tags column. You can then filter the dashboard by clicking the tags. |
|
|
| Disabled Time Window | If you specify a Time Window here, the rule will not run that Time Window. If you specified a time window in the Time Window field, and that time window overlaps with the Disabled Time Window, the rule will not run during the intersection between the two Time Windows (if any). |
|
|
Parameters Area
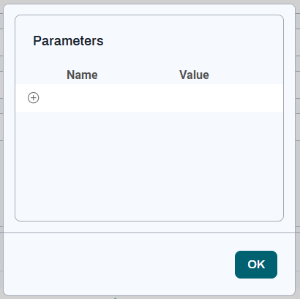
If the Job Definition has Parameters that are flagged as being Part of Key, you can specify name/value pairs for those Parameters in order to restrict this rule to monitoring Jobs that have those Parameters and values.
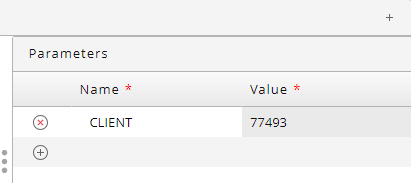
To add a Parameter name/value pair, click . If this button is not displayed, the selected Job Definition does not have any Parameters that are designated as Part of Key.
Alerts Area
The Alerts area includes tabs for Email Alerts, Alert Alerts, and Custom Alerts.

Each of these tabs includes some common settings. These are described in the following table.
| Field | Description | Default Value |
|---|---|---|
| Priority |
Lets you select when the Alert should be triggered, based on predicted values.
Note: Because Alert triggering is based on a Job's predicted runtime rather than its actual runtime, it is possible to have "false alarms" where an Alert is triggered, but the Job actually finishes on time. If you want to minimize such "false alarms," use the Low setting. |
|
| Enabled | Lets you enable or disable the Alert. | true
|
| Auto Confirm | If this is set, confirmation of SLA Operator Messages is automatic. | true
|
Alert Types
Each Alert has a type that indicates what specifically triggered the Alert. You can include this type in message bodies using the alertType replacement variable.
-
PredictedAlert: Triggered when the Job's predicted start time (for SLA for starttime) or end time (for SLA for endtime) is after the SLA Deadline. This Alert is triggered (if necessary) as soon as RunMyJobs calculates a Job's predicted start time.
-
DeadlineAlert: Triggered if the Job has not started (for SLA for starttime) or ended (for SLA for endtime) when the SLA Deadline passes.
-
Finished: Triggered if the Job starts (for SLA for starttime) or ends (for SLA for endtime) after the SLA Deadline, but within the Late Offset.
Warning: The name of this Alert type is a bit misleading, because if the rule is an SLA for starttime rule, this Alert type indicates that the Job has started, not finished.
-
HalfMissedAlert: Triggered if the predicted start time (for SLA for starttime) or end time (for SLA for endtime) is halfway to the end of the Late Offset. This Alert is triggered (if necessary) as soon as RunMyJobs calculates a Job's predicted start time.
-
Missed: Triggered if the Job has not started (for SLA for starttime) or ended (for SLA for endtime) when the Late Offset ends.
Email Alerts Area
You can use the controls in this tab to configure an email to be sent by the System_Mail_Send Job Definition if the SLA Rule detects a failure. To add an email Alert, click .
Tip: For information about providing execution-specific information in the email body, see Replacement Variables.
Note: For a description of the fields not described in this table, see Alerts Area.
| Field | Description | Default Value |
|---|---|---|
| Email address | The address to send the Alert email to. |
|
| Subject | The subject of the Alert email. | A default subject based on the state of the SLA Rule. |
| Body | The body of the Alert email. | A default body based on the state of the SLA Rule. This field must contain source code for a valid HTML document. For more information, see Email Alert Body Options. |
Alert Alerts Area
If you would like to take additional actions rather than just sending an email (such as, for example, raising an escalation), you can use the controls in this tab to arrange for an Ad Hoc Alert to be sent if the SLA Extension detects a problem. Note that you will need to create Alert Source first.
To add an Ad Hoc Alert to the active SLA Rule, click in the Alert Alerts area.
Note: For a description of the fields not described in this table, see Alerts Area.
| Field | Description |
|---|---|
| Alert Source | The Ad Hoc Alert source to trigger. |
| Alert Source Data | The data to send to the Ad Hoc Alert source. |
Custom Alerts Area
You can use the controls in this tab to submit your own custom Job Definition or Workflow Definition if the SLA Extension detects a problem. You must create this Job Definition or Workflow Definition yourself, and name it SLA_Custom_Alert. It must be in the same Partition as the SLA Extension.
If this Job Definition or Workflow Definition has Parameters, you can pass Parameter name/value pairs using the Parameters column. To do so, add a row and then click in the Parameters column. A Parameters dialog box displays, letting you specify the values to be sent to your custom Job Definition or Workflow Definition.
To add a custom Alert, click .
Note: For a description of the fields not described in this table, see Alerts Area.
| Field | Description |
|---|---|
| Parameters | The Parameter name/value pairs to be passed to the SLA_Custom_Alert Job Definition or Workflow Definition. |
Replacement Variables
You can use replacement variables in the Subject and Body fields for an email to provide specific information about the problem detected by the SLA Extension. For example, you could set the email Subject field to Rule breach for ${jobId} from ${jobDefinition}.
| Replacement Variable | Description |
|---|---|
${jobId}
|
The ID of the Job that breached the SLA. |
${ruleName}
|
The name of the SLA Rule. |
${jobDefinition}
|
The name of the Job Definition or Workflow Definition. |
${description}
|
A description of the breached Job. |
${requiredJobTime}
|
The SLA Deadline time. |
${ruleType}
|
The type of the rule (Starttime or Endtime). |
${predictedJobTime}
|
The predicted start time (for SLA for starttime) or end time (for SLA for endtime) for the Job. |
${alertText}
|
Default Alert text based on the state of the SLA Rule. |
${alertType}
|
The Alert type. |
${alertPriority}
|
The Alert priority: Low, Medium, or High. |
${parameters.<parameter name>}
|
The value of the indicated Parameter. |
Email Alert Body Options
You have three options for the email Alert Body field.
-
Manually enter text, optionally using replacement variables.
-
Enter the path to a Document (for example:
doc:REDWOOD/SLA_EmailAlert_Template.html). The Document can also use replacement variables. -
Leave the field blank. If you do not enter any text in the Body field, RunMyJobs inserts default body text based on the state of the SLA Rule associated with the monitored Job.
The following example shows a sample email Body that uses replacement variables.
For example:
<html>
<head><title>Email</title></head>
 <body>
  <p>SLA ${alertType} Breach </p>
  <p>Jobid=${jobId} </p>
  <p>Jobname=${jobDefinition}</p>
  <p>SLA deadline: ${requiredJobTime}</p>
  <p>Details:</p>
  <ul>
   <li>Alert priority: ${alertPriority}</li>
   <li>SLA Rule: ${ruleName}</li>
   <li>Job description: ${description}</li>
  </ul>
 </body>
</html>
Event and Lock Dependencies
The SLA Extension's predicted end times are calculated based on Job and Workflow dependencies. If Jobs on the critical path for the SLA Deadline have Events and/or Locks, they will be taken into consideration only if the Jobs they are depending on are also being monitored by the SLA Extension.